The Subscription Advantage Pack (SAP) is now available for both AutoCAD Map 3D 2010 and Civil 3D 2010.
The SAP for AutoCAD Map 3D 2010 contains valuable new functionality for using and visualizing point clouds that further extends the capabilities of AutoCAD Map 3D 2010 software. This pack also includes 3 new tutorials and Autodesk ImageModeler 2009 software.
The SAP for AutoCAD Civil 3D 2010 contains the functions for AutoCAD Map 3D as well as a Roundabout Layout Tool and about 20 other enhancement tools for Transportation, Survey, and Visualization.
Here is the URL to login to the Subscription Center.
http://subscription.autodesk.com
Thursday, October 22, 2009
Thursday, September 24, 2009
Friday, September 18, 2009
AutoCAD Map 3D 2010: Map 3D Update 1
AutoCAD Map 3D 2010's first update is now available.
Click HERE to download the update.
Wednesday, September 16, 2009
AutoCAD Civil 3D 2010: Missing info in the Subassemblies Tool Palette
You installed Civil 3D 2010 from a deployment from the DVDs. When you start the product, you noticed that the Tool Palette subassemblies were missing.
This is a known issue. To correct the problem, replace the RegisteredTools, Tool Catalogs and ToolPalette subdirectories from a computer where the subassemblies are working.
If you don't have access to a computer where the subassemblies are working properly, follow these instructions.
1. Copy the entire i.e. D:\x86\C3D\CONTENT directory from DVD 2 into the ….AdminImage\x86\C3D directory to overwrite the existing Content folder.
2. Modify the deployment and proceed through the configuration steps to update your deployment.
3. Repair your installation of Civil 3D 2010, using Add or Remove Programs in the Control Panel (Windows). Select the Reinstall option.
4. Start Civil 3D 2010 and confirm that tool palettes have subassemblies.
This is a known issue. To correct the problem, replace the RegisteredTools, Tool Catalogs and ToolPalette subdirectories from a computer where the subassemblies are working.
If you don't have access to a computer where the subassemblies are working properly, follow these instructions.
1. Copy the entire
2. Modify the deployment and proceed through the configuration steps to update your deployment.
3. Repair your installation of Civil 3D 2010, using Add or Remove Programs in the Control Panel (Windows). Select the Reinstall option.
4. Start Civil 3D 2010 and confirm that tool palettes have subassemblies.
Tuesday, September 1, 2009
AutoCAD Map 3D 2010 Seminar Series
Wow. What a response to this series. We sold out in just a few days. Thanks to all that have signed up. We will continue this series after the first of the year so if you didn't get into this series we'll get you into the next one....
Monday, August 24, 2009
AutoCAD Map 3D 2010 Seminar Series
Join me for a free informative luncheon seminar series focusing on AutoCAD Map 3D 2010. A variety of topics will be covered with each seminar covering a specific function of this program. Learn to utilize AutoCAD Map 3D 2010 to its full potential.
The seminars will take place the third Friday of every month through the end of the year at the Surveyors Exchange Training Center, located at 3630 Springer St. Sessions are from 12 noon to 1 p.m. and lunch will be provided.
Registration is limited to 20 people per session so register early!
Source Drawings and Queries
Aug. 21, 2009
Creating, Editing, and Classifying Geometry
Sept. 18, 2009
Linking and Managing Drawing Based Attribute Data
Oct. 16, 2009
Importing and Exporting Drawing Based Data
Nov. 20, 2009
Stylizing Drawings - Using the Display Manager
Dec. 18, 2009
Tuesday, August 4, 2009
AutoCAD Civil 3D 2010: Civil 3D Update 1
AutoCAD Civil 3D 2010's first update is now available. It corrects a lot of known issues.
Click HERE to see all the resolved issues in this update.
Click HERE to download the update.
Click HERE to see all the resolved issues in this update.
Click HERE to download the update.
Thursday, July 23, 2009
AutoCAD Map 3D: Google Earth Extension for Map 3D
AutoCAD Map 3D 2010 has a new FDO provider that allows you to publish drawings into Google Earth. But there are times when you need a georeferenced image inside AutoCAD Map 3D to use as an underlay. The Google Earth Extension for Map 3D is a handy application to get this done.
Here is the URL to download and install the Extension:
http://labs.autodesk.com/utilities/google_earth_extension_beta/
Here is the URL to download and install the Extension:
http://labs.autodesk.com/utilities/google_earth_extension_beta/
Monday, June 22, 2009
MapGuide Maestro: Editor interface for MapGuide Open Source
MapGuide Maestro is an Open Source (LGPL) map authoring tool for MapGuide Open Source.
MapGuide Maestro is a free application that can ease the management of spatial data in MapGuide Open Source. Currently MapGuide Maestro has specialized editor interfaces for editing the following components of MapGuide Open Source: Feature sources, Layer definitions, Map Definitions, Web Layouts and Fusion Layouts.
http://trac.osgeo.org/mapguide/wiki/maestro/Downloads
MapGuide Open Source: MapGuide Open Source 2.1 is now available
MapGuide Open Source is a free web mapping platform that enables users to quickly develop and deploy web mapping applications and geospatial web services. MapGuide features an interactive viewer that includes support for feature selection, property inspection, map tips, and operations such as buffer, select within, and measure. MapGuide includes an XML database for managing content, and supports most popular geospatial file formats, databases, and standards. MapGuide can be deployed on Linux or Windows, supports Apache and IIS web servers, and offers extensive PHP, .NET, Java, and JavaScript APIs for application development. MapGuide Open Source is licensed under the LGPL.
Here is the URL to download MapGuide Open Source.
http://mapguide.osgeo.org/download
In order to take full advatage of MapGuide Open Source, you'll also need to download Maestro. I'll post a blog about Maestro later today......
Here is the URL to download MapGuide Open Source.
http://mapguide.osgeo.org/download
In order to take full advatage of MapGuide Open Source, you'll also need to download Maestro. I'll post a blog about Maestro later today......

Friday, June 19, 2009
AutoCAD Map 3D: Fdo2Fdo - Copy and Manage FDO Data Sources
This is a great application. It allows you to copy data from SHP files to SDF, from SHP to Oracle, Oracle to SDF. Basically allows you to copy data from any FDO Data Store to any FDO Data Store.
http://www.sl-king.com/fdo2fdo/download/download.html
http://www.sl-king.com/fdo2fdo/download/download.html
Tuesday, June 16, 2009
AutoCAD Map 3D: What is LandXML?
Several companies, including Autodesk, teamed up to create a method for exchanging project information across different software packages, and LandXML is the result. LandXML is a generic, text-based file format used to save project data. It's similar to a DXF™ file, which is a generic file format for vector-based drawing information. LandXML recognizes the following project data:
Points
Point groups
Description keys
Surfaces
Parcels
Horizontal alignments
Profiles
Cross sections
LandXML files are always given the extension .xml, and you can view them in any web browser (such as Microsoft Internet Explorer or Netscape Navigator).
LandXML is commonly used to interchange Survey and Civil Engineering data. You can use a LandXML file:
To transfer information between different Autodesk products such
as Land Desktop, Civil 3D, and Now AutoCAD Map 3D.
To move or rotate sets of points, surfaces, or alignments.
To convert data between metric and imperial projects.
With style sheets to export LandXML data and create customized reports
Note: AutoCAD Map 3D 2010 only supports points information at this time. Surfaces are currently not supported but may be supported in the future.
Thursday, June 11, 2009
AutoCAD Map 3D: Connect to an ArcSDE Provider using FDO
Several of the classes I attended online a few weeks ago were delivered by Neal Niemiec. He is a very bright guy and an excellent instructor. I learned a ton from him and I'm sure you will too. Here is his blog. Please visit it when you can.
http://cadngis.blogspot.com/
This simple exercise will walk you through the configuration and setup to connect to a public ArcSDE site (ver 9.2) and bring that data into the AutoCAD Map 3D user environment.
The first thing you have to do is download and install the ArcGIS Explorer (FREE ESRI Viewer). It can be found here.
http://resources.esri.com/arcgisexplorer/index.cfm?fa=download
Once you've installed the application, you'll need to Copy the pe.dll, sde.dll, sg.dll located in the C:\Program Files\ArcGIS Explorer\bin directory to the C:\Program Files\AutoCAD Map 3D 2010\FDO\bin directory.
FDO Provider For ArcSDE EXERCISE
1. Connect to an ArcSDE Provider using FDO by clicking on the Data icon in the display Manager and choosing – ‘Connect to Data’

2. Connect to the UTAH GIS ArcSDE Portal by using the ‘Add ArcSDE Connection’ – information on the login credentials can be found here: http://gis.utah.gov/sgid_connect or following the screen shot below. The User Name and Login are: agrc
NOTE – it might take a considerable amount of time to connect and retrieve data from this server as it is public!

3. Once you have the available layers you will check the AIRPORTS schema and add that to your map.
 4. Next, find out how many objects are within the AIRPORTS Layer … (hint) you will need to first select the AIRPORTS layer in the display manager and click on the Data Table Icon

Wednesday, June 10, 2009
AutoCAD Map 3D: Integrating AutoCAD Map 3D with Google Earth
A few weeks ago I attended One Team University presented by Autodesk. All 14 classes were delivered online which made it interesting. Below is one of the classes I took. All content was developed by Autodesk. During the exercise there's some text you have to copy and paste into the provider.xml file. Please email me if you want the dataset and text to complete the exercise.
Here are the files you'll need to configure your system to work with Google Earth:
1. Download FDO2FDO ver 7.6 from SL King website
http://www.sl-king.com/Fdo2Fdo/download/download.html
2. Download the FDO Provider 3.3 for KML from SL King website
http://www.sl-king.com/FdoKML/download/download.html
3. Download Google Earth
http://pack.google.com/intl/en/integrated_eula.html?hl=en&ciint=ci_earth&ci_earth=on&utm_source=en-cdr-earth4&utm_medium=cdr&utm_campaign=en
This exercise will go over the capabilities of FDO third party providers that will enable AutoCAD Map 3D 2010 to work with KML data sources. KML is the data type used to store geometry by Google Earth.
1. Extract the contents of FdoKingKml_FDO_3_3_1_v0_1_2.zip to C:\Program Files\AutoCAD Map 3D 2010\FDO\bin – these 2 dlls (KingKmlProvier.dll / libexpat.dll) will be used to connect to KML
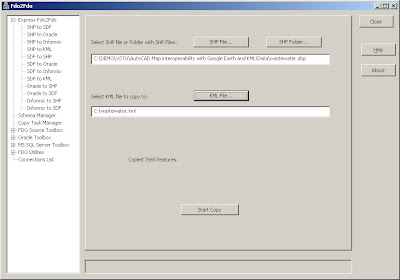
2. Create a new folder on your C:\ called FDO2FDO and extract the contents of Fdo2Fdo_v0_7_6.zip to it. Create a shortcut on your desktop to C:\FDO2FDO\Fdo2Fdo.exe
3. Double Click the FDO2FDO shortcut
4. Choose the ‘Express FDO2FDO’ option and use the .SHP to .KML option. Extract the wastewater.shp files that came in the exercise .ZIP file
5. From FDO2FDO click the SHP file button and select the wastewater.shp. Click the KML File button and set the KML to go to C:\wastewater.kml.
6. Click > Start Copy, when finished Close FDO2FDO
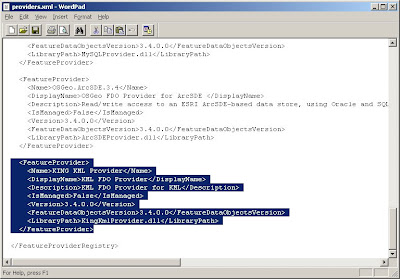
7. Goto C:\Program Files\AutoCAD Map 3D 2010\FDO\bin and create a backup of the providers.xml file in the directory called providers_bkup.xml
8. Right click on providers.xml and open the file with wordpad
9. Copy the following before the tag at the bottom. Click > Save
10. If you have AutoCAD Map 3D open, close and reopen the application
11. Open the Display Manager and choose the DATA button and ‘Connect to Data’

12. Enter C:\wastewater.kml for the file > Click Connect

13. Check on the KMLFDOCLASS and Click > Add to Map

Here are the files you'll need to configure your system to work with Google Earth:
1. Download FDO2FDO ver 7.6 from SL King website
http://www.sl-king.com/Fdo2Fdo/download/download.html
2. Download the FDO Provider 3.3 for KML from SL King website
http://www.sl-king.com/FdoKML/download/download.html
3. Download Google Earth
http://pack.google.com/intl/en/integrated_eula.html?hl=en&ciint=ci_earth&ci_earth=on&utm_source=en-cdr-earth4&utm_medium=cdr&utm_campaign=en
This exercise will go over the capabilities of FDO third party providers that will enable AutoCAD Map 3D 2010 to work with KML data sources. KML is the data type used to store geometry by Google Earth.
1. Extract the contents of FdoKingKml_FDO_3_3_1_v0_1_2.zip to C:\Program Files\AutoCAD Map 3D 2010\FDO\bin – these 2 dlls (KingKmlProvier.dll / libexpat.dll) will be used to connect to KML
2. Create a new folder on your C:\ called FDO2FDO and extract the contents of Fdo2Fdo_v0_7_6.zip to it. Create a shortcut on your desktop to C:\FDO2FDO\Fdo2Fdo.exe
3. Double Click the FDO2FDO shortcut
4. Choose the ‘Express FDO2FDO’ option and use the .SHP to .KML option. Extract the wastewater.shp files that came in the exercise .ZIP file
5. From FDO2FDO click the SHP file button and select the wastewater.shp. Click the KML File button and set the KML to go to C:\wastewater.kml.
6. Click > Start Copy, when finished Close FDO2FDO

7. Goto C:\Program Files\AutoCAD Map 3D 2010\FDO\bin and create a backup of the providers.xml file in the directory called providers_bkup.xml
8. Right click on providers.xml and open the file with wordpad
9. Copy the following before the tag at the bottom. Click > Save

10. If you have AutoCAD Map 3D open, close and reopen the application
11. Open the Display Manager and choose the DATA button and ‘Connect to Data’

12. Enter C:\wastewater.kml for the file > Click Connect

13. Check on the KMLFDOCLASS and Click > Add to Map

14. Close the Data Connect dialog
15. Edit some of the features using the Check-out and Check-in FDO method


15. Edit some of the features using the Check-out and Check-in FDO method

16. After making changes close the drawing and double click on c:\wastewater.kml. You will be able to see your changes in Google Earth.

Tuesday, June 9, 2009
The Great Alaskan Autodesk Roadshow

If you're in Anchorage Alaska on June 24, please stop by and take a look at the new technology available in the Autodesk 2010 products. Select the image to view the agenda, list of speakers and to register.
Thursday, April 30, 2009
AutoCAD Map 3D: Accessing an ESRI Personal Geodatabase
We had a great group of students in our AutoCAD Map 3D Class April 27 - 29. I enjoyed their participation and they asked some great questions. They were really thinking about the topics we covered, and based on the questions you could see they were thinking about applying the new knowledge at work. The students varied in job roles from a CAD Manager to an ESRI expert. One student managed the City of Petersburg's facilties which included cemetary plots. Since 1987 I've taught a lot of people how to use Autodesk tools, but this is the first time I've had a person that manages cemetary plots in my class. 8-)
One of the students spent a tremendous amount of time researching and setting up AutoCAD Map 3D to access an ESRI personal geodatabase. He was nice enough to bring in the .dll file and .xml code to class on the last day so we could learn from his experience.
In order to access an ESRI personal geodatabase you need two items. First you'll need the .dll file. This file must reside in the FDO\bin directory. It's typically located here:
C:\Program Files\AutoCAD Map 3D 2009\FDO\bin
The second item you'll need is the new .xml code. This code must be added to the providers.xml. This file can be edited using notepad and it's located in the same directory as the .dll file.
We weren't able to get this configuration to work in AutoCAD Map 3D 2010 but it did work in AutoCAD Map 3D 2009. If you would like the .dll file and .xml code, please send me an email and I'll send it to you.
Wednesday, April 8, 2009

Friday, March 27, 2009
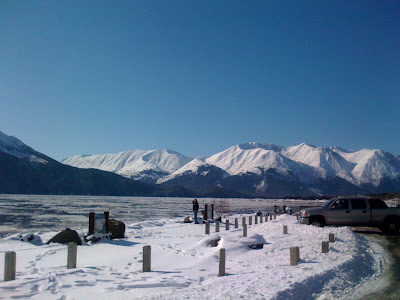
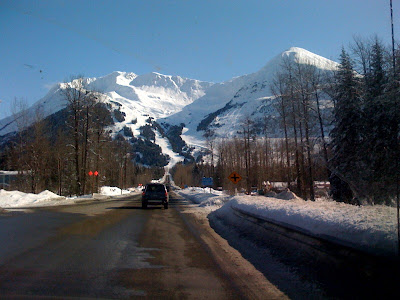
Alaska is beautiful......
We made it to Alaska!!!!! The flight from Seattle to Anchorage was amazing. The mountains go directly from the ocean, straight up, and as far as you can see. We took the first few days in Anchorage to find our way around. It’s a nice city, surrounded by mountains, reminds me a lot like Reno.
We took the Seward Highway to the Alyeska Ski Resort and took a bunch of photos. The Turnagain Arm is mostly frozen, I’m sure it is amazing during the summer. I understand that Beluga Whales can be seen in this area.
I started at The Surveyors Exchange on Monday. These people are really cool and I’m looking forward to working with them for a long time.
The house we are renting is directly across from the first Surveyors Exchange office. They have this amazing TV room. The back row is 5 reclining lounge chairs, the front row has the softest chairs I’ve ever sat in. They have a bunch of blankets so we can curl up and stay warm. They even have a popcorn maker and it tastes and smells just like the popcorn you get at a theater. It’s a great place to hang out while it’s snowing. Every night you can catch us there watching a movie or two. The room has a complete surround sound system, 9’ screen and red velvet curtains that make the room look just like a real theater. They even have rows of white lights along the floor…. 8-)
I’m attending Robert Gadbaw’s Civil 3D training the next few weeks. He’s coming up from New Zealand; hopefully he’ll be able to get in. Alaska Airlines shut down most of their flights into Anchorage recently because of the eruptions from Mount Redoubt.
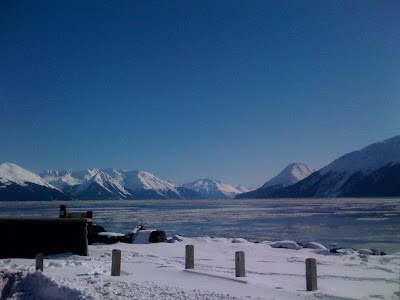
Tuesday, February 17, 2009
Back to Work!!!!
I’ve accepted a position at the Surveyors Exchange in Anchorage Alaska. I’m really looking forward to working with them and it will be great to get back to work. I’ll continue working with Map and MapGuide but I also get to use my Civil Engineering skills working with and teaching Civil 3D. I’ll expand this blog to include Civil 3D tips and tricks.
One of the “perks” is the ability to travel to New Zealand and do some Map and MapGuide consulting for Robert Gadbaw. He is one of the top Civil 3D instructors in the world and I’m looking forward to learning from him.
As many of you know I have a huge passion for fly fishing. I get to work with some great people and fish some of the most amazing waters in the world. This will be an adventure of a lifetime and has always been a dream of mine. I’ll update my fly fishing blog after every fishing trip. And there will be a ton of those!!!!!! I’ll also check out the local poker scene. Anchorage has a bunch of “house” games.
You can find out all the details about The Surveyors Exchange on their website at http://www.tse-ak.com/
Monday, February 9, 2009
Two new Blogs and my LinkedIn URL
Everything you wanted to know and more. 8-)
http://www.linkedin.com/in/georobertanderson
I've also created two new blogs. If you are into fly fishing, take a look. http://www.rizekillah.blogspot.com/
If you enjoy reading about poker strategy, here you go.
http://www.blackpocket10s.blogspot.com/
http://www.linkedin.com/in/georobertanderson
I've also created two new blogs. If you are into fly fishing, take a look. http://www.rizekillah.blogspot.com/
If you enjoy reading about poker strategy, here you go.
http://www.blackpocket10s.blogspot.com/
Saturday, February 7, 2009
The Geospatial Value Chain: Stage Five
This post is the fifth in a five part series and will explain the five stages of the Autodesk geospatial value chain. The five-stage model may help you understand where you are today and how you can extend the value of your geospatial data going forward. This series is taken from the "Best Practices for Managing Geospatial Data" document.
Stage Five: Topobase and Other Applications
In Stage 5, GIS data and functionality is used across different departments and applications. At this stage, mapping data becomes an integral part of the enterprise. GIS data and functionality are woven into other systems, integrating with assessor databases, permitting systems, enterprise resource planning (ERP) systems, and more. Autodesk, Autodesk partners and resellers, and system integrators can all help customers build powerful solutions to meet specific business goals and manage specific workflows.
Data in an FDO feature source, such as Oracle or Microsoft SQL Server, can be used by many departments and enterprise applications. For example, If your company already has a back-office system managing work-order and asset records using an Oracle database, you can use AutoCAD Map 3D to manage the spatial data and attribute data that goes with those records.
Your existing systems may connect data in an FDO feature source to data or processes in a customer relationship management (CRM) or ERP system and may not even generate a map. CAD and GIS do not always generate output in map form. They can also provide data to an application server for geospatial analysis (machine to machine or application to application).
Stage 5 is the stage of powerful solutions. Many Autodesk customers are already operating in Stage 5, managing geospatial data in sophisticated databases and integrating with other enterprise applications. Alongside AutoCAD Map 3D and MapGuide, customers can deploy Autodesk Topobase, which makes this kind of powerful solution easier to build and easier to manage by adding additional tools, such as business rules, topology, long transactions, workflows, network analysis, and reporting.
Autodesk Topobase provides vertical applications to manage different types of infrastructure, such as water, wastewater, and power. These individual applications come preconfigured with industry-specific data models. The data models capture relations between features. For example, the water module manages features such as pipes, hydrants, and valves, the relationships between those features, and all the underlying attributes relevant to those features. By providing centralized access to spatial data and enhanced processes, Autodesk Topobase improves the way vital tasks get done throughout organizations.
Thursday, February 5, 2009
The Geospatial Value Chain: Stage Four
This post is the fourth in a five part series and will explain the five stages of the Autodesk geospatial value chain. The five-stage model may help you understand where you are today and how you can extend the value of your geospatial data going forward. This series is taken from the "Best Practices for Managing Geospatial Data" document.
Stage Four: Spatial Databases
Moving from Stage 3 to 4, you extend the use of your information. At this stage, you start to make full use of relational databases. Stage 3 and Stage 4 are almost the same, except Stage 3 is still a file-based environment (for example, based on SDF) while Stage 4 is based on a relational database management system (RDBMS). If you are already at Stage 3, it is very easy to migrate from SDF or SHP files to a full-scale RDBMS, such as Oracle or Microsoft SQL Server. With AutoCAD Map 3D, you can move from one type of database solution to another as your requirements evolve. Any database schema can be translated into any other. You don’t need proprietary middleware, so you are never locked into any one database or software vendor.
In Stage 4 you gain the benefits of:
➔ RDBMS security and scalability
➔ Multiple users reading and writing any information
➔ Sophisticated data models
You may find that you want to move up to a database after you have been using SDF or SHP and have been in Stage 3 for a while. For example, you may have a lot more people interested in, or dependent upon, the data. You may be wondering how you are going to organize and manage the rules and security models for these additional people. How will you scale a system that supports at present only ten people to hundreds or even thousands more users? Stage 4 is based on the same data as Stage 3, but employs more powerful software to meet the requirements of an expanded organization.
Wednesday, February 4, 2009
The Geospatial Value Chain: Stage Three
This post is the third in a five part series and will explain the five stages of the Autodesk geospatial value chain. The five-stage model may help you understand where you are today and how you can extend the value of your geospatial data going forward. This series is taken from the "Best Practices for Managing Geospatial Data" document.
Stage Three: AutoCAD Map 3D + FDO
AutoCAD Map 3D provides data-access and data-management tools to make the process of integrating different types of data easier. In particular, FDO data providers and a consistent data-connect interface simplifies access and management of multiple feature sources. With AutoCAD Map 3D, you can extend your existing workflows and take advantage of efficiencies created through geospatial tools and store some of your information in a spatial data store, such as SDF. Also, you can augment your maps (DWG or other) by bringing in data from a variety of formats, including free data sources, such as web services (WMS and WFS).
SDF (Spatial Database File) format can be very useful at this stage. SDF is an open format for storing both geometry and associated attribute data. The SDF format is a GIS-oriented alternative to DWG. SDF has some significant advantages over DWG:
➔ It stores and manages an order of magnitude more data than DWG.
➔ It is very fast, allowing Autodesk applications, such as AutoCAD Map 3D and MapGuide (Autodesk MapGuide Enterprise and MapGuide Open Source), to read and display tens of thousands of features per second.
➔ It provides the power of a database without the overhead and cost of a full relational database management system (RDBMS), such as Microsoft® SQL Server™ or Oracle®.
➔ An SDF file can store a single feature class, or it can store multiple feature classes.
➔ It is easy to manage, providing access to the database schema.
With AutoCAD Map 3D, you can extend the traditional reach of DWG files and combine data sources with maximum flexibility.
Tuesday, February 3, 2009
The Geospatial Value Chain: Stage Two
This post is the second in a five part series and will explain the five stages of the Autodesk geospatial value chain. The five-stage model may help you understand where you are today and how you can extend the value of your geospatial data going forward. This series is taken from the "Best Practices for Managing Geospatial Data" document.
Stage Two: AutoCAD Map 3D
Stage Two: AutoCAD Map 3D
At this stage, CAD files are still used as the primary data source, but AutoCAD Map 3D is used as the application for creating and editing geospatial data. AutoCAD Map 3D makes it easier for engineers, drafting technicians, and GIS specialists to collaborate on projects and to share mapping information. Project teams can use their AutoCAD knowledge and training while taking advantage of GIS tools and functions.
AutoCAD Map 3D provides specific functionality that is not available in AutoCAD:
➔ Multi-user access—Access DWG drawings at the same time.
➔ Work across tiles—Attach and query multiple DWG files, which makes it easier to work with tiled data sets.
➔ Coordinate systems—Bring in DWG, GIS, and raster data with different coordinate systems and havethe data overlay properly.
➔ Drawing cleanup—Detect and fix geometric errors in DWG files.
➔ Import/Export—Bring in data from other departments and vendors and combine it with data in yourDWG files (for example, ESRI SHP).
Many customers who have invested in AutoCAD Map 3D use only the basic features listed above and continue to maintain a large library of DWG maps. Data is stored as object data or as links to an attached database, such as Microsoft® Access.
When your organization wants to extend its CAD information to more people and to make use of additional mapping (GIS) capabilities, you may be ready to move to Stage 3.
Monday, February 2, 2009
The Geospatial Value Chain: Stage One
This post is the first in a five part series and will explain the five stages of the Autodesk geospatial value chain. The five-stage model may help you understand where you are today and how you can extend the value of your geospatial data going forward. This series is taken from the "Best Practices for Managing Geospatial Data" document.
Stage One: AutoCAD or AutoCAD LT
Since it was first introduced, AutoCAD has been used by engineers and drafting technicians to create maps. These CAD maps stored in DWG files have provided a viable mapping solution for municipalities, public works departments, utility companies, and many other organizations. Many of these organizations have migrated from paper-based, mylar, or vellum files, and now store their infrastructure data in DWG drawings on the desktop computer or in a file directory on a server. Data for individual assets is often stored as blocks, along with the attribute data associated with them.
However, there are several limitations to a system that uses a CAD program such as AutoCAD or AutoCAD LT as the principal mapping tool:
➔ Only one user can access any particular DWG map.
➔ The maps have no geo-referencing information (coordinate system) assigned to them.
➔ AutoCAD does not import or export commonly used mapping formats, such as SHP.
If your organization is using AutoCAD or AutoCAD LT but needs to add spatial intelligence to the data, bring in data from other sources, or allow multiple designers to edit the same data, you have outgrown Stage 1 and may be ready to move to Stage 2 or Stage 3.
Tuesday, January 27, 2009
AutoCAD Map 3D: Creating Calculations with Expressions
You can use operators and functions to calculate a new value based on existing property values. You can use the resulting value to filter or select data. For example, you can calculate the area of parcels and then select parcels whose areas are above a certain area value.
In AutoCAD Map 3D, you can store the resulting calculation as a new property in the Data Table. The calculated property is stored with the map, but is not written back to the original data store. To save the property to a data store,export the layer to an SDF file.
The syntax for calculations varies, depending on whether you use operators or functions.
There are two special calculations you can perform: finding the area of a polygon and finding the length of a linear feature.
You must be online and connected to the data store that contains the data for the calculation in order to create or manage calculations.
For some calculations, values do not update automatically because their underlying functions are not supported by their data providers. Instead, the values display as read-only properties. If you do not see a new calculated value immediately, refresh the layer manually. Right-click the layer in Display Managerand click Refresh Layer.
To perform a calculation using an operator
1. Select the command for which you want to create an expression.
2. In the expression area, do one of the following:
■ Enter a property name manually.
■ Click Property. Select the property you want.
3. To insert an operator, do one of the following:
■ Enter an operator for this property manually.
■ Click an operator button.
■ Click Operators. Select the operator you want.
4. Select or enter the value to evaluate.
For example, if you are multiplying the value of the property, enter the number or insert a property to multiply by.
5. Specify any further conditions for the expression.
To create a complex property evaluation, insert an AND or OR operator,and then insert another operator/property combination.
To perform a calculation using a function:
1. Select the command for which you want to create an expression.
2. In the expression area, click one of the following and select a function:
■ Math Function
■ Text Functions
■ Date Functions
3. Click Property and select the property to apply the function to.
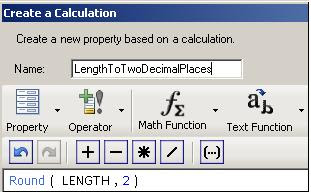
4. Click OK to apply the expression.
To find area or length
1. Select the command for which you want to create an expression.
2. In the expression area, enter or insert the geometric function (Area2D or Length2D).
3. Insert the property Geometry in parentheses after the function.
The Geometry property may have a different name in your data store. It is always listed under Geometry Properties in the Property list. Insert the property from the list. Do not change it manually or substitute a value for this property.
4. Click OK to apply the expression.
Monday, January 19, 2009
AutoCAD Map 3D: Troubleshooting Validation Errors in Expressions
When you save an expression, it is always checked to be sure it is valid. You can also check whether your expression is valid before you save it.
The validation checks the syntax of the expression, whether the properties you specified are present in the current data store, and whether the values for those properties are valid.
 When possible, the validation operation displays a message describing the errors it finds. Often, you can click this error message to place the cursor at the problem spot so you can correct it.
The validation checks the syntax of the expression, whether the properties you specified are present in the current data store, and whether the values for those properties are valid.
When possible, the validation operation displays a message describing the errors it finds. Often, you can click this error message to place the cursor at the problem spot so you can correct it. Validation might fail for one of the following reasons:
■ A separator character is missing or invalid. For example, you may use a function with arguments that need to be separated by commas. Perhaps one of the commas is missing, or you entered a semicolon instead of a comma.
■ An operator or property is missing. This is common in expressions with multiple conditions. For example, the expression PARCEL_VALUE > 100000 AND <> 100000 AND PARCEL_VALUE <>
■ A character or property is the wrong type. You may have used an operator that requires a numeric value and inserted a text character instead. You may have used a function that requires a hexadecimal value and supplied a numeral instead. You may have used a text property when a numerical one was required.
■ A required value is missing or “empty.” Perhaps you failed to insert a property value or a value for an argument.
■ The expression is missing a bracket, quotation mark, or parenthesis character. For example, there is an opening bracket that has no related closing bracket. This is common in complex expressions.
The validation process can help you avoid many errors, but it cannot guarantee that your expression will work the way you intend when it is applied. Validation does not execute the query against actual data, it only checks that the expression syntax is correct and that the properties and values are valid for the current data store.
Thursday, January 8, 2009
AutoCAD Map 3D: The Blog
Thanks for stopping by. Please take a look at the Blog Archives in the right hand column for great information regarding FDO, Database Linkage, Drawing Cleanup, Object Data, and Rubbersheeting. If you have any topics that you would like discussed please contact me at: geospatialtech@gmail.com
AutoCAD Map 3D: Overview of Expressions
An expression is the part of a query that specifies its
conditions. A query evaluates data and returns only the
subset of data that meets the query’s conditions.
For example, an expression might specify all parcels on
a particular street whose area is larger than 4000 square
feet. Only parcels that meet those criteria are displayed
or selected by a query containing this expression.
A complete query also specifies the set of data to which
the conditions are applied and the action to apply to
the data that meets the conditions. For example, you
can query a particular feature layer in a map and either
display or hide data in that layer, depending on whether
it meets the query conditions or not.
In practice, you specify the data set by selecting the
feature class or layer to query before you build the
expression. You specify the action to apply when you
select the command that lets you build the expression.
The title bar for the dialog box in which you create
expressions will be different, depending on the
command you choose. The contents of the dialog box
are much the same, no matter what it is called.
Use expressions to filter geospatial data, select a
subset of data, calculate values, or convert data from
one data type to another. Use text expressions to format
text strings for display, for example, as labels. Use
numeric expressions to apply math functions to
properties with numeric values.
Basic Steps for Creating Expressions
To create an expression, follow these basic steps:
■ Specify the data to which the expression will be
applied. For example,select the layer to filter.
■ Select a command that can use an expression.
For example, right-click a layer and select Filter To Select.
■ Use an expression to specify the conditions for the command.
For example, create an expression to specify the subset
of features on the layer to select.
Subscribe to:
Posts (Atom)